


Winter Home Prep Checklist Top Areas to Protect Before the Cold Season

Cold weather has a way of finding every weak spot in a house. A tiny gap around a door turns into a draft. A clogged gutter turns into an ice problem. A furnace filter you meant to change in October suddenly matters a lot more in January.
The good news is that winter prep doesn’t have to be overwhelming. You don’t need to rebuild your home before the first freeze. You just need to focus on the areas most likely to cause stress, water damage, heat loss, or safety issues once temperatures drop.
This winter home prep checklist walks through the top areas to check, clean, seal, and service before the cold season settles in.
Disclaimer
The Organized Guy highly recommends hiring licensed professionals who are certified in their respective field of home improvements and repairs. Engaging qualified experts ensures that your projects are completed safely and effectively, adhering to all necessary regulations and standards.

Start outside where winter does the most damage
Your home’s exterior takes the first hit from rain, snow, ice, wind, and freezing temperatures. A quick walk around the outside of the house can catch small issues before they become expensive repairs.
Clean gutters and downspouts
Gutters are easy to ignore until water goes where it shouldn’t. Leaves, twigs, pine needles, and roof grit can block the flow of water. When temperatures fall, that trapped water can freeze, expand, and add weight to the gutter system.
Before winter, clear gutters and flush downspouts with a hose. Make sure water exits away from the foundation, not right beside the house.
Look for:
Sagging gutter sections
Loose brackets
Downspouts that drain too close to the foundation
Water stains on siding below the gutters
Soil erosion under roof edges
If your area gets snow and ice, gutter problems can lead to ice buildup along the roofline. Clean gutters won’t prevent every winter roofing issue, but they help water move the way it should.
Check the roof from the ground
You don’t need to climb onto the roof to spot obvious trouble. From the ground, look for missing shingles, curled edges, damaged flashing, or dark patches that might point to wear.
Pay close attention to areas around:
Chimneys
Skylights
Vents
Valleys where roof sections meet
Low-slope areas
If something looks off, call a roofing professional before winter weather makes access harder. A small roof leak in mild weather can become a big interior problem once snow melts and refreezes.
Seal gaps around windows, doors, and siding
Cold air sneaks in through gaps. Water can, too. Check around window frames, door trim, vents, and places where pipes or wires enter the house.
Use exterior-rated caulk for small gaps and weatherstripping for doors that leak air. If daylight shows around a door, cold air will almost certainly come through.
A simple way to check for drafts is to move your hand slowly around frames on a windy day. If you feel cold air, seal it before heating season kicks in.
Trim branches and clear outdoor clutter
Winter storms can bring heavy snow, ice, and strong wind. Trim branches that hang over the roof, touch siding, or sit too close to power lines. For any branches near utility lines, call the utility company or a qualified tree service.
Store or secure outdoor items like:
Patio umbrellas
Lightweight furniture
Garden tools
Hoses
Planters that could crack in freezing weather
Disconnect garden hoses and shut off exterior faucets if your home has interior shutoff valves. Let the faucet drain so water doesn’t freeze inside the line.
Protect the places where water can freeze or seep in
Water is one of winter’s biggest troublemakers. It expands when it freezes, which can crack pipes, damage masonry, and push into weak spots around the home.

Insulate exposed pipes
Pipes in unheated or underheated spaces need extra attention. That includes pipes in garages, crawl spaces, basements, attics, and along exterior walls.
Foam pipe insulation is inexpensive and simple to install. Wrap or cover exposed pipes before temperatures drop below freezing. In especially cold areas, heat tape may help, but follow the product instructions carefully and use only products rated for the pipe material and location.
Focus on:
Water supply lines in exterior walls
Pipes under sinks on outside walls
Basement rim joist areas
Crawl space plumbing
Garage utility sinks or laundry lines
When a hard freeze is expected, opening cabinet doors under sinks can help warmer indoor air reach pipes. Letting faucets drip slightly can also reduce pressure buildup in vulnerable lines.
Look around the foundation
Take a slow walk around the base of the house. Check for cracks, gaps, pooling water, and soil that slopes toward the foundation.
A good rule is simple: water should move away from the house. If it collects near the foundation, it can seep into basements or crawl spaces. In freezing weather, water in cracks can expand and make small openings worse.
Add soil where needed to improve grading, but don’t pile it against siding or wood trim. Keep mulch a few inches away from the foundation and siding so moisture doesn’t sit there.
Test sump pumps and basement drains
If your home has a sump pump, test it before winter storms arrive. Pour water into the pit and make sure the pump turns on, moves water out, and shuts off properly.
Check that the discharge line is clear and points away from the house. If the line freezes or gets blocked, the pump can’t do its job.
Basement floor drains should also be clear of debris. If you notice slow drainage, sewer smells, or backups, bring in a plumber before winter weather adds pressure to the system.
Protect masonry and concrete
Cracks in walkways, steps, patios, and driveways can get worse through freeze and thaw cycles. Water enters the crack, freezes, expands, and widens the gap.
Seal small cracks with a product made for concrete or masonry. Larger cracks, uneven steps, or sinking areas may need professional repair.
Also check brick chimneys, stonework, and exterior stairs. Loose mortar can allow water in, and winter can speed up the damage.
Get heating and airflow ready before you need them
Heating systems tend to fail when they’re working the hardest. A little care before winter can help your system run more safely and keep rooms more comfortable.
Schedule heating system service
If you use a furnace, boiler, or heat pump, schedule a seasonal check before the coldest stretch of the year. A technician can inspect the system, clean key parts, check safety controls, and catch worn components before they cause a breakdown.
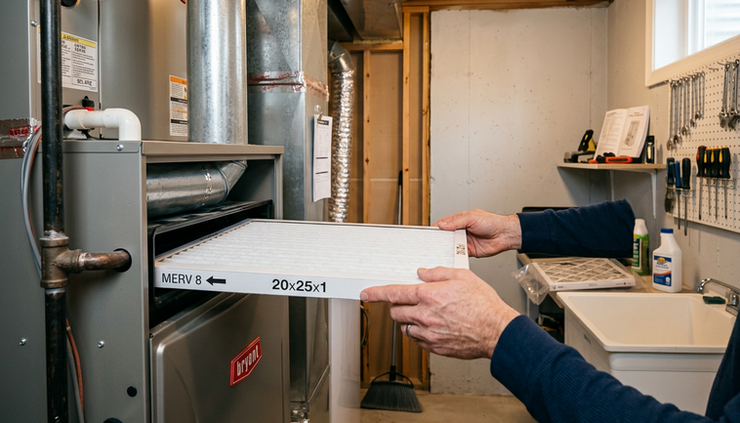
For forced-air systems, replace the filter before heating season starts. Then check it monthly during heavy use. A clogged filter makes the system work harder and can reduce airflow.
If you use radiators, baseboard heat, or a boiler system, look for leaks, strange noises, or rooms that don’t heat evenly.
Check vents, returns, and registers
Blocked vents can make rooms feel cold and strain the heating system. Walk through the home and make sure furniture, rugs, curtains, or storage bins aren’t covering registers or return vents.
If one room always feels colder, check for simple causes first:
Closed or blocked vents
Drafty windows
Gaps under doors
Poor attic insulation above the room
Leaky ductwork
For homes with ducts in attics, crawl spaces, or garages, leaky ducts can waste heat before it reaches the room. Sealing duct leaks may make a noticeable difference.
Reverse ceiling fans
Most ceiling fans have a small switch that changes blade direction. In winter, set the fan to run clockwise on low speed. This gently pushes warm air down from the ceiling without creating a strong breeze.
This works especially well in rooms with high ceilings, open staircases, or fireplaces.
Seal hidden air leaks
Weatherstripping doors and caulking windows are good starts, but many air leaks hide in less obvious places.
Check around:
Attic hatches
Recessed lights below attics
Plumbing openings under sinks
Electrical outlets on exterior walls
Baseboards on outside walls
Dryer vents and exhaust fans
Use the right material for the gap. Caulk works for small stationary cracks. Spray foam can fill larger gaps around pipes or framing openings. Weatherstripping works for moving parts like doors and attic hatches.
Make safety checks part of winter prep
Winter means more time indoors, more heating equipment running, and more chance of power outages. Safety checks don’t take long, but they matter.
Test smoke and carbon monoxide alarms
Test every smoke alarm and carbon monoxide alarm in the home. Replace batteries if needed, unless the unit has a sealed long-life battery. Check the manufacture date, too. Alarms don’t last forever, even if they still beep during a test.
Carbon monoxide alarms are especially important if your home has:
Gas or oil heat
A fireplace
A gas water heater
An attached garage
A fuel-burning stove or appliance
Place alarms according to the manufacturer’s instructions and local code. If an alarm sounds, get outside and call emergency services.
Clean fireplaces and chimneys
If you use a wood-burning fireplace or stove, have the chimney inspected and cleaned as needed. Creosote buildup can create a fire hazard, and blockages can send smoke or gases back into the home.
Before lighting the first fire of the season, check that the damper opens fully. Make sure the firebox is clean and the screen or doors work properly.
For gas fireplaces, look for dust buildup, odd smells, or trouble starting the unit. If anything seems wrong, schedule service before using it.
Prepare for power outages
A winter storm can knock out power for hours or longer. Put together a simple outage kit before you need it.
Include:
Flashlights and extra batteries
Phone power banks
Bottled water
Shelf-stable food
Manual can opener
Blankets
Basic first aid supplies
Pet supplies, if needed
If you use a generator, keep it outdoors and far from windows, doors, and vents. Never run a generator in a garage, basement, porch, or attached space. Carbon monoxide can build up quickly.
Check walkways and entry areas
Slips are one of the most common winter hazards around the home. Before icy weather arrives, repair loose steps, uneven pavers, wobbly railings, and poor lighting near entrances.
Keep ice melt, sand, or traction material near the door so it’s easy to use. A sturdy doormat inside and outside each entrance can also cut down on tracked-in slush.
Do a room by room winter tune-up inside
Once the exterior, water systems, and heating are handled, move indoors. Small checks in each living area can make the home warmer, cleaner, and easier to manage all season.
Kitchen
Look under the sink for leaks, damp spots, or drafty pipe openings. If plumbing runs along an exterior wall, seal gaps where pipes enter the cabinet.
Clean the range hood filter if you cook often. Winter usually means more indoor cooking, and good ventilation helps control moisture and odors.
Check pantry staples, too. Keeping easy meals on hand helps during snow days or power interruptions.
Bathrooms
Bathrooms create a lot of moisture, and winter keeps windows closed. Test exhaust fans by holding a tissue near the fan grille. If the fan pulls the tissue upward, it’s moving air. If not, clean the cover and check for dust buildup.
Look for cracked caulk around tubs, showers, and sinks. Water can get behind loose caulk and cause hidden damage. Recaulk before the problem spreads.
Laundry area
Clean the dryer lint trap after every load, but also check the dryer vent before winter. A clogged vent can slow drying, waste energy, and create a fire risk.
Go outside while the dryer runs and make sure warm air exits the vent. Clear lint, leaves, or snow from the exterior vent cover.
Attic
The attic plays a huge role in winter comfort. Look for signs of roof leaks, damp insulation, pest activity, or blocked vents.
Good attic insulation helps keep heat inside the living space. Good attic ventilation helps reduce moisture buildup. Both matter.
If you see frost on the underside of the roof deck, damp insulation, or dark staining, bring in a professional. That can point to air leaks, ventilation problems, or roof issues.
Garage
Garages often hold items that don’t handle freezing temperatures well. Move paint, caulk, certain cleaners, and liquids that can freeze to a warmer space if the label recommends it.
Check the seal along the bottom of the garage door. If light comes through, cold air, water, and pests can come through, too.
Store snow shovels, ice melt, and winter tools where you can reach them easily. Don’t bury them behind summer gear.

Keep the checklist simple and start early
Winter prep works best when it happens before the first real cold snap. You don’t have to finish everything in one weekend. Pick the areas that matter most for your home and climate, then work through them in order.
A simple order looks like this:
Clear gutters and check drainage.
Seal obvious drafts and exterior gaps.
Protect exposed pipes.
Service the heating system.
Test safety alarms.
Prep entryways, walkways, and winter supplies.
Check attics, basements, garages, and utility areas.
If you only have time for a few tasks, focus on water, heat, and safety. Those are the areas most likely to cause urgent problems in the middle of the season.
A well-prepped home feels different in winter. It’s warmer, safer, quieter, and less stressful when the weather turns rough. Start with one walk around the outside, one room-by-room pass inside, and a short list of fixes. That’s enough to put your home in much better shape before the cold season arrives.
All My Best,
Vinnie The Organized Guy


Comments